Sidebar (sidebar) is an area on your WordPress site that can contain widgets such as categories, latest posts, search, or ads. Customizing your sidebar helps you adjust the layout and display the important content you want your visitors to see. In this article, we will show you how to customize your WordPress sidebar to improve user experience and increase the aesthetics of your website.
Step 1: Add Widget To Sidebar
WordPress offers the ability to customize sidebars through the use of widgets. You can add, remove or move widgets easily.
How to Add Widgets to Sidebar
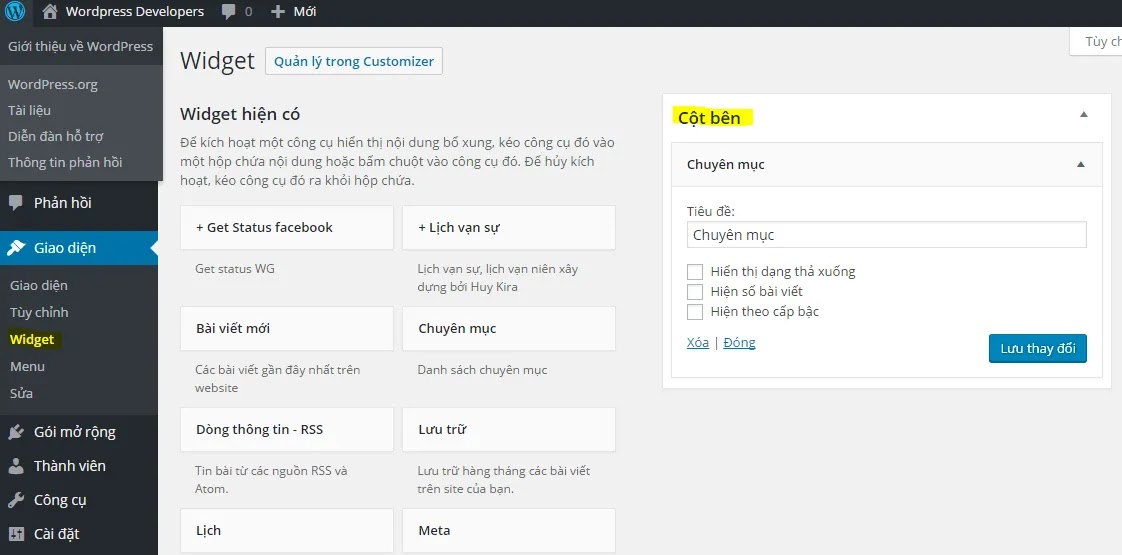
- Access the WordPress dashboard, go to Interface -> Widgets.
- Here, you will see a list of available widgets and sidebar areas that you can add widgets to.
- Drag and drop widgets from the list on the left into the sidebar area you want to customize.
- Once done, click Save to save changes.

Step 2: Use Plugin to Customize Sidebar
In addition to using default widgets, you can use plugins to enhance sidebar functionality. Several plugins help you manage and customize your sidebar flexibly.
Use Custom Sidebars Plugin
Plugins Custom Sidebars allows you to create multiple custom sidebars and display them on different pages.
How to Install and Use the Custom Sidebars Plugin
- Access Plugins -> Add New in the WordPress dashboard.
- Search for plugins Custom Sidebars and click Install Now (Install now).
- Once installed, click Activate (Activate).
- Visit Interface -> Widgets to start creating new custom sidebars.
With this plugin, you can create separate sidebars for different pages, posts, or categories, giving each content on your site a unique experience.
Step 3: Customize Sidebar Interface Using CSS
To be able to customize the sidebar interface as you like, you can use CSS. CSS helps you adjust the color, spacing, font, and size of sidebar elements.
Sidebar Custom CSS Example
/* Thay đổi màu nền của sidebar */#sidebar {
    background-color: #f4f4f4;
    padding: 20px;
}

/* Tùy chỉnh tiêu đề widget */#sidebar .widget-title {
    font-size: 18px;
    color: #333;
    font-weight: bold;
}

/* Thay đổi kiểu dáng cho các liên kết trong sidebar */#sidebar a {
    color: #3498db;
    text-decoration: none;
}

#sidebar a:hover {
    color: #2980b9;
}
You can add this custom CSS code to the section Additional CSS (Additional CSS) in the WordPress Customizer or use Child Theme to persist changes.
Step 4: Customize Sidebar For Each Specific Page
If you want to display different sidebars for each specific page or post, you can use the conditional sidebar feature. This helps you display relevant content for each type of page.
How to Customize Sidebar Conditions
- Use plugins Custom Sidebars to create separate sidebars for each type of page.
- When editing a page or post, you’ll see the option to choose a custom sidebar to replace the default sidebar.
- Select the sidebar you want to display for that page and save your changes.
Tips for Effective Sidebar Customization
- Keep the sidebar neat: Don’t add too many widgets to the sidebar to avoid confusing users.
- Show important content: Place widgets that display important content like popular posts, categories, or contact information to help users find it easily.
- Use CSS for customization: Leverage CSS to create stylistic consistency between the sidebar and the entire website.
- Check on mobile devices: Make sure your sidebar displays well on both mobile and desktop devices.
Customize sidebars
Customizing sidebars on WordPress makes it easy to create a user-friendly interface and optimize access to important content. By adding widgets, using plugins, and customizing with CSS, you can create a more unique and professional sidebar. Start customizing your sidebar today to enhance your user experience and enhance the aesthetics of your website!

